


Table of Contents
Some weeks the garden gets your full attention. Other weeks, life is loud and your motivation is somewhere else entirely. This June has been one of those weeks for me.
We’re in a transitional season here at Little Mountain Ranch — selling the property and not quite knowing what comes next. June is already a full month even in the best of years, with recitals, graduations, and the garden suddenly demanding everything at once. I came down with a cold on top of it all.
But I went to the garden anyway. And I’m glad I did, because there was a lot worth doing. Here are six tasks I worked through this week, with the reasoning behind each one, in case any of them are useful for your garden. You can join me on my wander in the video below.
Apple Tree Thinning: How and Why to Do It
Apple thinning is one of those tasks that feels counterproductive the first time you do it. You’re removing fruit from a tree that’s trying to give you fruit. But the long game is worth it.
I thin my apples out to about 6 to 8 inches apart, and I don’t do it all at once. I spread it over a couple of weeks, walking along and doing a little at a time.
Here’s why it matters:
- Apples aren’t true biennials, but they behave like one when they’re allowed to over-produce. A massive crop one year often leads to a sparse crop the next. Thinning keeps the tree producing consistently, year after year.
- In a bumper crop year, the weight of too much fruit can actually snap branches. Removing the excess now protects your tree later.
Tip: Aim for 6 to 8 inches between remaining fruits. You don’t need to be exact. Walk the tree slowly and work in stages rather than trying to do it all in one go.

Mulching Potatoes with Grass Clippings
If I had to choose one mulch for my entire garden, it would be grass clippings. I’ve used them on my potatoes for years and they make everything easier.
Here’s what I love about them:
- They mat together. Once they dry slightly, grass clippings form a dense layer that suppresses weeds better than loose mulch.
- They’re easy to handle. Light, spreadable, and simple to tuck around plants without smothering anything.
- They break down quickly. Within a week, they’re already starting to decompose and feed your soil. You’re mulching and composting at the same time.
- They’re free. Every time you mow, you have more mulch.
I plant my seed potatoes about 6 to 8 inches deep and then mulch on top, building up the layer throughout the summer.
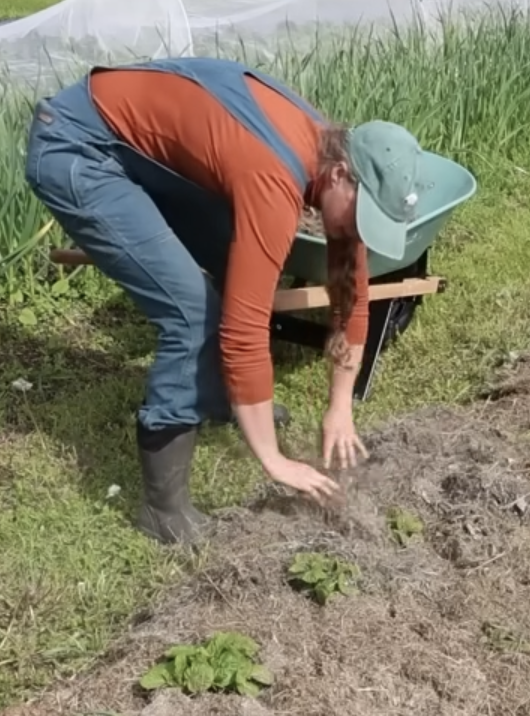
One important caveat: If your grass has gone to seed, or you’ve got a lawn full of dandelions that have bolted, don’t use those clippings in your garden. You’ll be sowing weeds right along with your mulch. Wait until after you’ve mowed a couple of times once the seed heads are gone.
Growing Potatoes Without Hilling
While we’re talking potatoes: I don’t hill mine and I still get excellent harvests most years.
Traditional hilling involves planting potatoes in a trench and gradually mounding soil up around the plant as it grows, which encourages more tuber development along the buried stem. It’s a solid method, especially for indeterminate varieties that keep producing tubers throughout the season.
But deep planting combined with consistent mulching gives me similar results without the extra work. I plant at 6 to 8 inches deep, mulch heavily, and keep adding mulch through the summer. The mulch builds up around the plant, keeps light away from developing tubers, retains moisture, and suppresses weeds.
Tip: Not sure if your variety is determinate or indeterminate? Early season varieties tend to be determinate. Late season varieties lean indeterminate. Deep planting and consistent mulching will serve you well regardless.
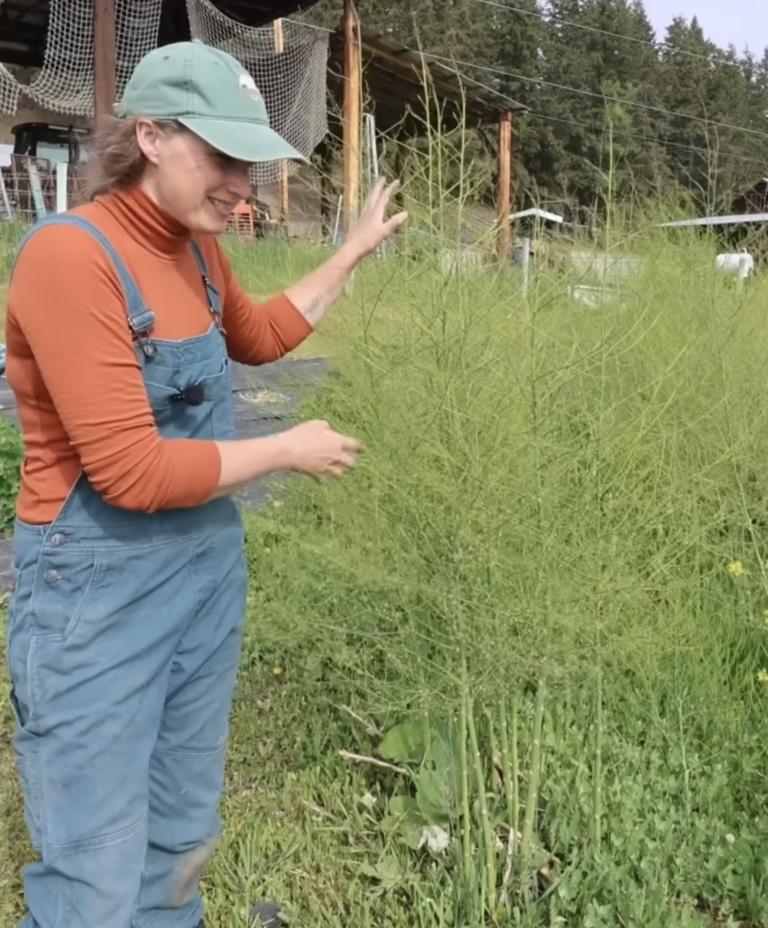
Letting Asparagus Go to Frond (and What to Do in Fall)
If you’ve been harvesting asparagus spears all spring, you may have already noticed the plant sending up feathery fronds. This is not a problem. It’s exactly what you want.
Those fronds are collecting energy from the sun and sending it back down into the crown so your asparagus has what it needs to produce again next year. Harvesting too heavily or cutting fronds down too soon will exhaust the crown over time.
What I do in fall (or early spring if I forget): I burn the asparagus patch right down to the ground once everything has dried out. It cleans up all that material quickly without having to cut it all by hand.
Tip: Try not to walk through your asparagus patch. The crowns sit quite close to the soil surface and foot traffic can damage them.
Harvesting Herbs Early and Often
June is a good month to start being aggressive with your herbs, especially if they’re starting to flower.
I harvested thyme, chocolate mint, and marjoram this week.
Here’s the approach I follow:
- For herbs that are starting to flower: cut back hard before the flowers fully open. Once herbs bolt, the flavour in the leaves often diminishes. Cutting now encourages a fresh flush of growth.
- For herbs that aren’t yet flowering: you can still take a significant amount. Early in the season, herbs bounce back quickly after a hard cut.
Don’t be timid about it. A large harvest now means another good harvest in a few weeks.
Freeze Drying Herbs: Strip Leaves Before You Start
This one’s a preservation tip, but since I brought in a pile of herbs to freeze dry this week, it’s worth including.
Strip the leaves from the stems before putting anything in the freeze dryer (or dehydrator).
I’ve skipped this step before when I was in a rush, tossing everything in whole and stripping after. With a dehydrator, that’s workable because the stems stay somewhat flexible. With a freeze dryer, the stems become extremely brittle and you end up with small woody pieces mixed in with your herbs. Not the end of the world, but worth the few extra minutes if you have them.
Printable Checklist: June Garden Tasks for Zone 3b
- Thin apples to 6 to 8 inches apart (do in stages over 2 weeks)
- Mulch potatoes with grass clippings (no seeded grass)
- Check asparagus — let fronds develop, do not over-harvest
- Harvest herbs before they flower; cut back hard
- Strip herb leaves before freeze drying or dehydrating
- Start a second succession of lettuce if you want summer greens (Salenova from Johnny’s resists bolting well)
- Shake tomato flowers gently to help with pollination if growing in a tunnel
June in Zone 3b is full. There’s always more to do than there are hours in the day. But even on the hard weeks, even when you have to make yourself go outside, the garden gives something back. It always does.
If you’d like more hands-on support and a community of northern growers who understand what we’re working with up here, come join us at the Little Mountain Ranch Community.