


This time of year, as the garden starts to wind down, our work shifts from harvesting outside to preserving inside. It’s a busy season, but one of my favorites, because it’s all about stocking our pantry for the quiet months ahead. For the first time in over 15 years, I didn’t raise our own meat birds this summer—life was just too full. Instead, we bought 50 beautiful, fresh chickens from a local farm to process.
Today, I want to walk you through my entire workflow for a big project like this. It might seem like a lot, but I break it down into manageable steps. The plan is simple:
- Break the birds down for canned boneless chicken (a lifesaver on busy weeknights).
- Roast the backs and wings to make a deeply flavoured stock.
- Pressure can both the chicken and the broth to fill the pantry shelves.
It’s a big job, but it’s one of those projects that pays you back tenfold on a cold night in February. So, let’s get started.
Tools & Setup
Before you start, getting your workspace set up makes the whole process go so much smoother. A sharp knife is your best friend here—it’s safer and makes the work so much easier. Here’s what I have on hand:
- Sharp boning or chef’s knife + steel (for frequent touch-ups)
- Two big bowls: one for meat and one for bones/backs
- Sheet pans + parchment (for roasting backs/wings)
- Pressure canner (I use a stovetop canner, but an approved electric one works too)
- Clean jars, new lids, and rings (just washed is fine; no need to sterilize for pressure canning)
- Large stockpot (I add garden veg to my broth, which I highly recommend)
Knife safety: Touch up the edge of your knife every 1–2 birds with a steel (about a 45° pass on each side). Wipe the blade clean before returning to the board.

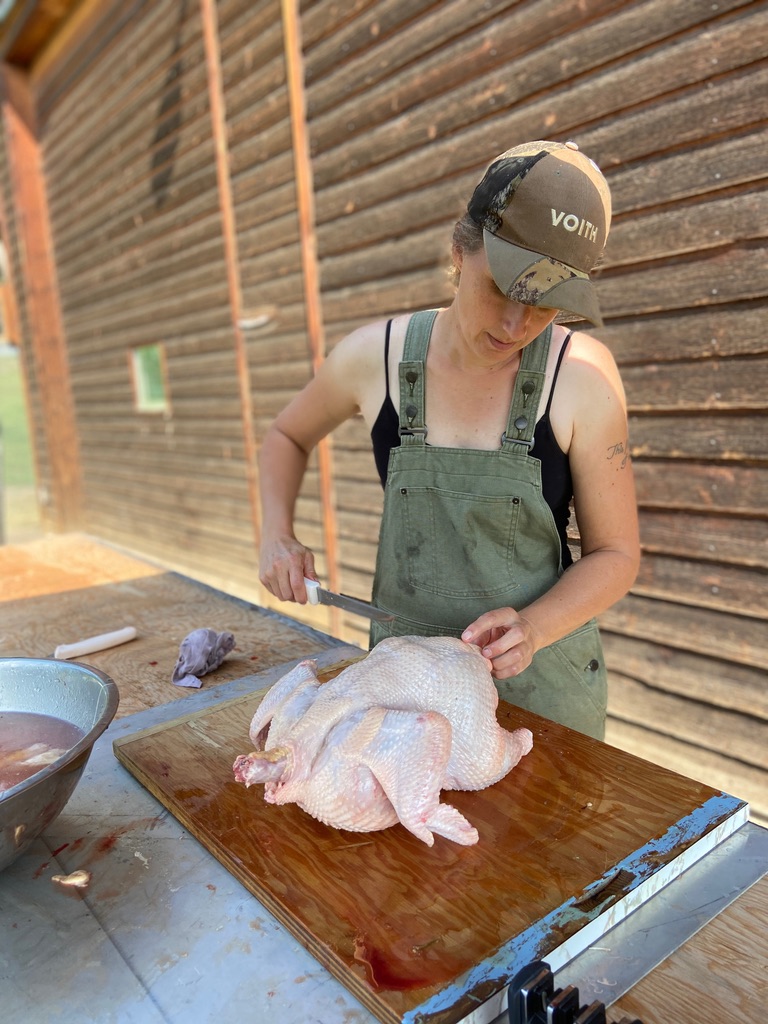
How to Part Out a Chicken (Fast & Safe)
Breaking down a whole chicken can seem intimidating, but once you learn where the joints are, it’s a surprisingly quick process. It’s a skill that will save you so much money over time. Here’s how I do it:
- Leg quarters: Slice the skin between the breast and thigh, then press down firmly to pop the hip joint out of its socket. Cut through the joint to remove the leg quarter. Repeat on the other side.
- (Optional) Separate thighs/drumsticks: Bend the leg to see the line of fat where the joint is; cut straight through that seam.
- Wings: I always leave the wings attached to the backs for a meatier, more gelatinous stock. If you want to remove them, do it the same way as the legs—find the joint and cut through.
- Breasts: Run the tip of your knife along one side of the keel bone (the bone in the center of the chest). Using shallow, smooth cuts, follow the ribcage to lift the breast off in one piece.
- Back + trimmings: Everything left over—the back, wings, and any trimmings—goes onto a sheet pan for roasting. This is the base of our broth.
Food safety: Always work with cold poultry. Take breaks to wash your hands and sanitize your knives and cutting boards as needed.
Tip: Keep the skin on if you plan to freeze the pieces (it protects from freezer burn), but I always remove the skin for canning the cubed breast meat.
Roast-First Broth: Maximum Flavour
This is my absolute favorite way to make broth. Roasting the bones first is an extra step, but it develops a deep, rich, golden flavor that you just can’t get from raw bones. It is so worth it.
- Roast the backs and wings at 350–400°F (175–205°C) until they are deeply browned.
- In a large stockpot, add the roasted bones. I also toss in onions (skins on for that beautiful golden color), carrots, celery tops, garlic, and any fresh herbs I have on hand. We’ll strain it all out later.
- Add cold water just to cover the bones. Bring it to a gentle simmer and let it go for hours (I usually let mine simmer all day).
- Strain the broth through a colander. I then chill it overnight (in the fridge or, in cold weather, on a protected porch) so I can easily lift off the solid fat cap before canning.
Pressure Canning: Chicken (Boneless Cubes)
Now for the part that gives you fast weeknight meals all winter long—canning the meat. We’re just packing plain chicken in water with a bit of optional salt, which makes it a perfect, neutral base protein for any meal.
- Prep: Cut the boneless, skinless chicken breast into 1-inch cubes.
- Pack the jars: Pack the raw chicken cubes into hot jars. Add ½–1 tsp salt per pint or 1–2 tsp per quart (this is optional and just for flavor).
- Fill: Top up the jars with boiling water. Debubble thoroughly to remove any air pockets, and add more water if needed to correct the headspace.
- Headspace: Leave a 1-inch (2.5 cm) headspace. Wipe the rims clean, apply the lids, and tighten the rings just until finger-tight.
- Process: Vent your canner for 10 minutes, then process at the correct pressure for your altitude.
- Pints: 75 minutes
- Quarts: 90 minutes
Pressure Canning: Chicken Stock
Once you’ve skimmed the fat from your chilled broth, it’s time to can that liquid gold.
- Prep: Skim the fat, then heat the broth to a simmer.
- Fill: Ladle the hot broth into hot jars.
- Headspace: Leave a 1-inch (2.5 cm) headspace. It’s very important to wipe the rims well, as any residual fat can cause a seal to fail. Apply lids and rings until finger-tight.
- Process: Vent your canner for 10 minutes, then process at the correct pressure for your altitude.
- Pints: 20 minutes
- Quarts: 25 minutes
Note: These times are for plain broth. If you add any solids like vegetables or meat, you are now making soup, and the processing time will be much longer. Always follow a tested soup recipe.
Troubleshooting: Siphoning & Liquid Levels
Don’t panic if you pull your jars out and the liquid level has dropped! This is called siphoning, and it’s very common, especially when canning chicken. I get it in my batches all the time.
What is it? A sudden change in pressure or temperature causes liquid to be forced out of the jars during the cool-down process.
Is it safe? Yes. As long as the jar sealed properly and you processed it for the full time at the correct pressure, the food inside is still safe to eat.
How to reduce it: Let your canner depressurize naturally (never force-cool it), and give it an extra 10 minutes to cool before opening the lid. Accurate headspace and proper debubbling also help.
And that’s my entire workflow, from whole birds to a pantry full of shelf-stable meals. I know it can look like a huge undertaking, but breaking it down into these steps makes it feel so much more manageable. It’s one of those big projects that pays you back tenfold on a busy weeknight in February when you can pull a jar of homemade chicken and broth off the shelf.
If you’re looking to build your confidence with canning and want a guide to walk you through the basics, I have something that can help. I’ve put together a comprehensive canning guide that covers essential tools, safety tips, and a few of my favorite beginner recipes. You can get it for free when you sign up for my newsletter, and I’ll send it straight to your inbox!
4 thoughts on “How I Part Out Chickens, Make Rich Chicken Broth, and Pressure Can It All (Step-by-Step)”
Hi Chelsea. This has nothing to do with chickens but I just saw an old pic of Margaret Atwood from 1972 and at first I thought it was you! I love watching your videos (I especially love seeing all the familiar Canadian objects/brands that I have in my own kitchen) and now I’m wondering if you are related to Canadian royalty lol. Hopefully the link below works for you; you’ll need to scroll down to see the pic of a young Margaret leaning on a fence rail.
https://www.nytimes.com/2025/11/01/books/review/margaret-atwood-book-of-lives-memoir.html
Haha! That is too funny. No, Chelsea is not related to Margaret Atwood.
Hi, thank you for the great step by step! I have a question, should you only can the breasts? Don’t the legs and thighs turn out nice? Or maybe they are best kept frozen…sorry, this is my first time canning!
Hello!
You can absolutely can the legs and thighs too, however, the final product tends to be tough and stringy. That’s why Chelsea prefers to freeze the legs and thighs and just can the breast meat.
Happy Canning!